


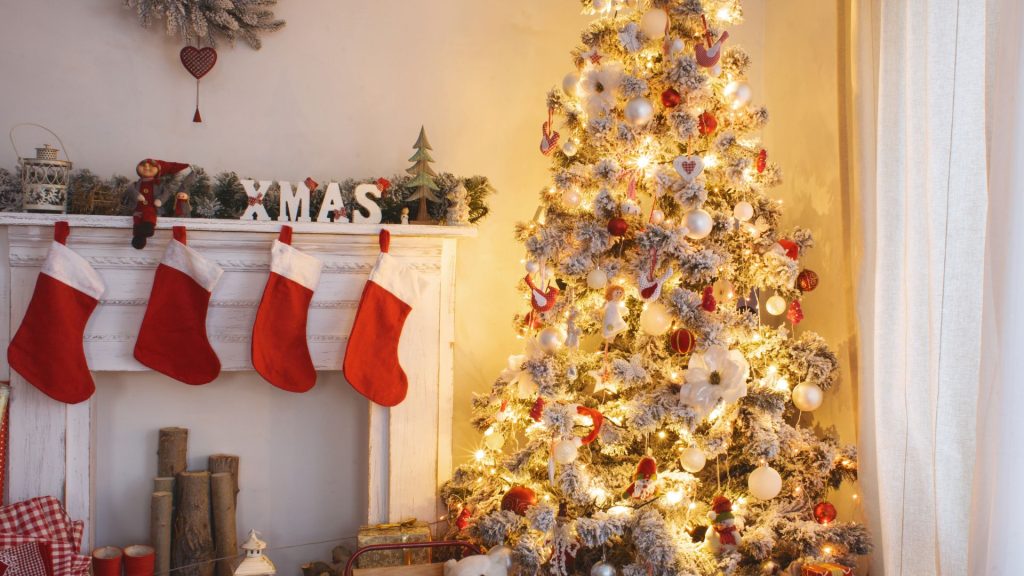
Putting up a neutral Christmas tree can be tricky. You want it to look festive and stylish but not too flashy. I get it – I’ve been there too.
The good news? You don’t need to be a pro to create a beautiful neutral tree.
In this blog, I’ll show you step-by-step how to decorate your tree like a pro. We’ll cover everything from choosing the right ornaments to adding the perfect finishing touches.
By the end, you’ll have all the tips and tricks to create a stunning neutral Christmas tree that fits your style. Ready to transform your tree?
Let’s get started with this easy-to-follow guide.
Preparing Your Neutral Christmas Tree

Before we dive into decorating, let’s get everything ready. This step is key to making your neutral Christmas tree look its best. I’ll walk you through picking the right colors and getting all your supplies together.
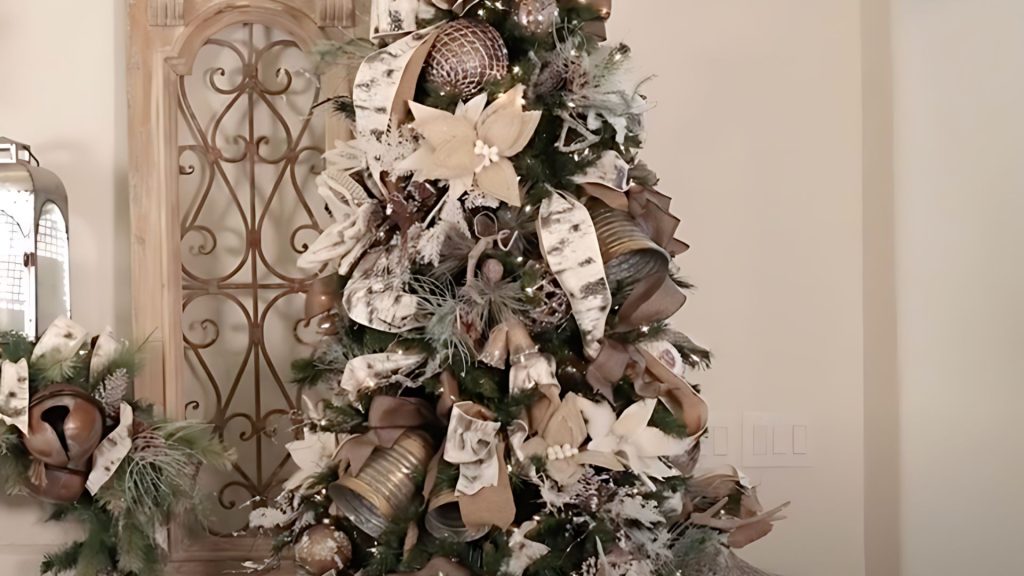
When it comes to neutral Christmas trees, color is everything.
I like to stick with whites, beiges, silvers, and golds. These colors work well together, creating a calm, classy look that fits any home style.
White makes your tree look clean and bright. Beige adds a warm touch without being too bold. Silver brings a bit of shine and catches the light nicely.
Gold adds a festive sparkle that says “Christmas” without shouting it.
Here’s a tip: Try using different shades of one color for a sleek look. And don’t forget to mix up the finishes—use some matte, some shiny, and some glittery decorations to make your tree more interesting.
Gather Your Supplies
1. Tree (Real or Artificial): First, pick your tree. Real or fake, it’s up to you. Just make sure it’s sturdy and looks full. This will be the base for all your hard work.
2. Lights (Warm White or Cool White): Next, grab some lights. You can wear warm white for a cozy feel or cool white for a more modern look. Either way, make sure you have enough to cover your whole tree.
3. Ornaments, Ribbons, Florals, and Tree Topper: Now for the fun stuff – ornaments, ribbons, florals, and a tree topper. Choose ones that match your neutral theme. Mix up sizes and textures to keep things interesting.
4. Extension Cords and Hooks: Don’t forget the practical items. You’ll need extension cords to plug in your lights without messy wires showing. Hooks are a must for safely hanging ornaments.
Step-by-Step Tutorial for Decorating a Neutral Christmas Tree
Step 1: Setting Up the Tree

Let’s start by getting your tree ready. This step is key to ensuring your tree looks great and stays safe.
Assemble and Fluff the Tree Branches
- First, put your tree together following the instructions that came with it.
- Then, it’s time to fluff those branches. Start at the bottom and work your way up.
- Spread out each branch tip to make the tree look fuller.
- This might take a while, but it’s worth it. A well-fluffed tree looks much nicer.
Ensure the Tree is Stable and Positioned Correctly
Now, let’s make sure your tree is steady.
- Put the stand on a flat surface and tighten all the screws.
- Pick a spot with plenty of room around it for decorating.
- Please keep it away from heaters and busy areas to keep it safe.
- Check now and then while you’re decorating to make sure it stays steady.
Add the Tree Skirt or Base Cover
Finish setting up by adding a tree skirt.
This hides the stand and makes everything look neater. Choose one that matches your neutral theme – white, beige, or silver work well. Make sure it’s big enough to cover the whole stand.
Smooth it out to keep things tidy.
Step 2: Adding the Lights
Now that your tree is set up, let’s add some sparkle with lights.
Start from the Bottom and Work Your Way Up
- Plug in your lights and start at the bottom of the tree.
- Wrap the lights around each branch, moving up bit by bit.
- This helps spread the lights evenly and avoid gaps.
Weave the Lights In and Out of the Branches for Depth
Weave the lights in and out of the branches to make your tree look extra special.
Push some lights towards the middle and pull some out to the tips. This gives your tree a 3D look that’s eye-catching.
Make sure you use plenty of lights. A good rule is to use 100 lights for each foot of your tree’s height. If it looks a bit dim, add more. Having lots of lights makes your tree glow and shows off your ornaments better.
Remember to test your lights before you start. You don’t want to discover that some bulbs don’t work halfway through!
I understand. I’ll create content for “Step 3: Creating a Tree Topper” and “Step 4: Incorporating Ribbon” based on your outline. I’ll keep the content precise, detailed, accurate, and relevant while adhering to your earlier guidelines.
Step 3: Creating a Tree Topper
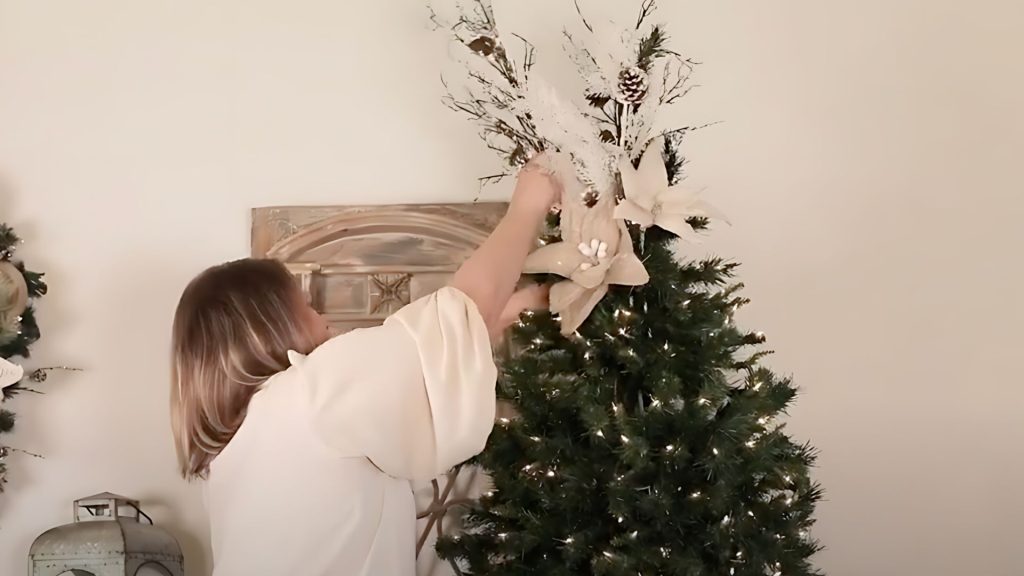
Let’s make your tree topper stand out. This part is fun because it’s where you can get creative.
Use a Mix of Decorative Stems for Height and Interest
- Pick a variety of stems that match your neutral theme.
- Go for tall, bold ones to catch the eye.
- Mix in some softer pieces, too.
- This gives your topper more depth.
- Stick to white, silver, and gold to keep that neutral look.
Position the Tallest Pieces First, Followed by Shorter Ones
- Start with your tallest stems in the middle.
- Then, add shorter ones around them. This creates layers and makes your topper look fuller.
- Make sure everything is spaced out evenly.
- Step back now and then to check if it looks balanced.
Tip: Secure the Topper with Floral Wire if Needed
If your topper feels wobbly, use some floral wire to keep it in place.
- Wrap the wire around the stems and the top of the tree.
- Use green or clear wire so it blends in.
- Be gentle so you don’t damage the stems.
- You could add a star or bow as a final touch.
Step 4: Incorporating Ribbon
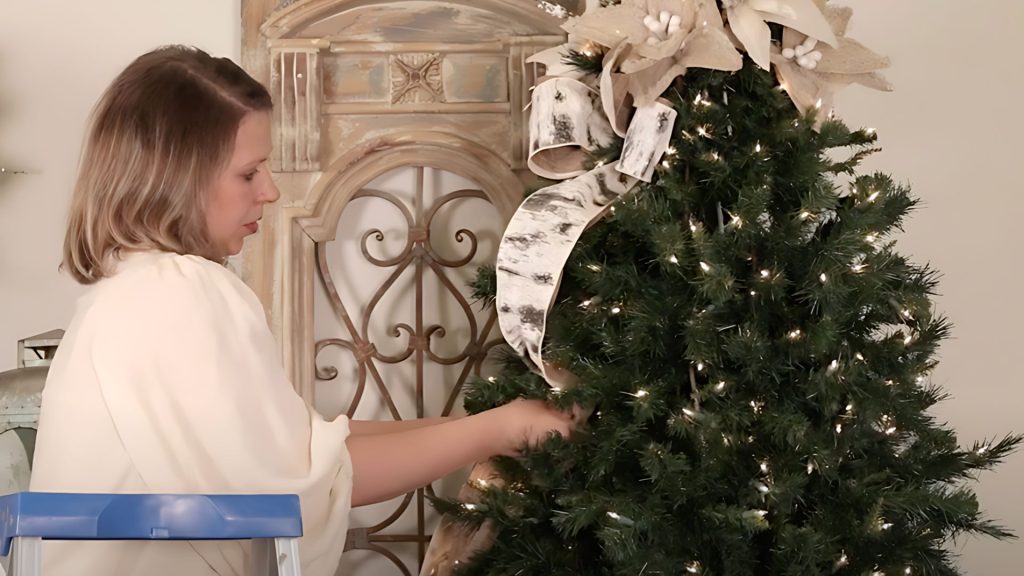
Ribbon adds a lovely flow to your tree. Here’s how to do it right.
Cut Ribbons into Manageable Lengths
- Cut your ribbon into pieces about 2-3 feet long.
- This makes them easier to work with.
- Use sharp scissors for clean cuts.
- If you can, get a ribbon with wire edges. It’s easier to shape.
Start at the Top and Cascade the Ribbons Down the Tree
- Begin at the top of your tree and work your way down.
- Secure the ribbon at the top with a small loop.
- Let it flow down naturally.
- Don’t pull it too tight – you want it to look relaxed.
Use Different Ribbon Textures and Widths for Variety
Mix up your ribbons. Use wide ones as your main feature and thinner ones for accent. Try different textures like satin, burlap, or lace. Keep everything in your neutral color scheme.
If you want, add some ribbons with subtle patterns for extra detail.
Create Loops and Secure Them with the Tree Branches
- With your ribbon, make loops of different sizes.
- Tuck these loops into the tree branches to hold them in place.
- Spread them out evenly around the tree.
- Give each loop a little twist before you secure it.
- This adds some extra style to your tree.
Step 5: Adding Florals and Sprays
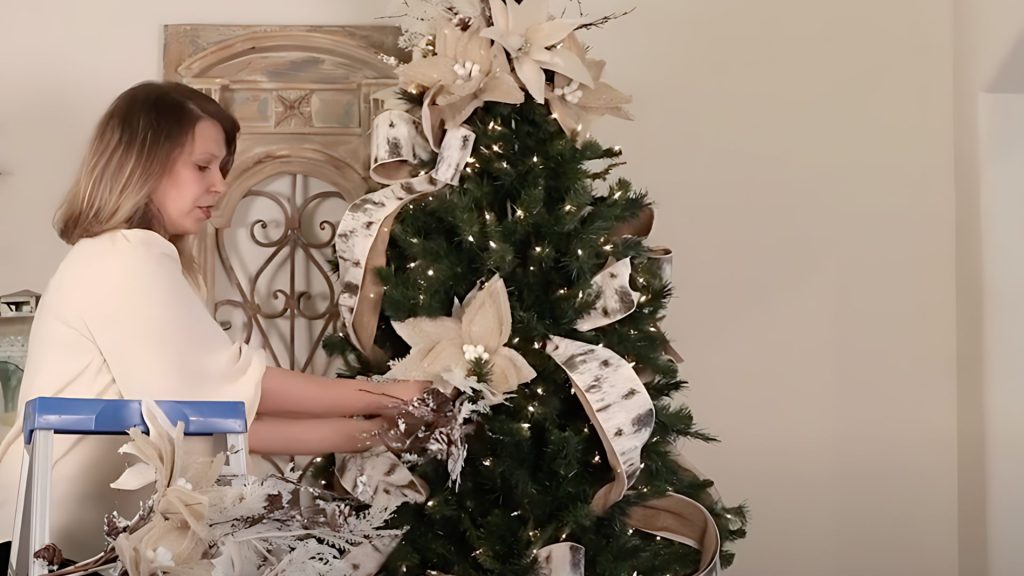
Now, let’s add texture to your tree with florals and sprays.
Create Clusters Using Various Floral Stems and Sprays
- Mix different types of stems to make clusters.
- Use a variety of textures and sizes.
- Tie them together with floral wire.
- Pick stems that fit your neutral theme – think frosted branches, white flowers, and silver sprays.
- Make some big clusters and some small ones for variety.
Place Clusters in a Zigzag Pattern for Balance
- Arrange your clusters in a zigzag pattern.
- Start at the top and work your way down, switching sides.
- Put some clusters deep in the tree and some near the outside.
- Step back now and then to check if everything looks balanced.
Fill Gaps with Single Stems and Sprays for Added Texture
- Use single stems to fill in any empty spots.
- Pick ones that match your clusters.
- Stick them in at different angles and depths.
- Don’t overdo it – you still want to see some green.
Step 6: Hanging Ornaments
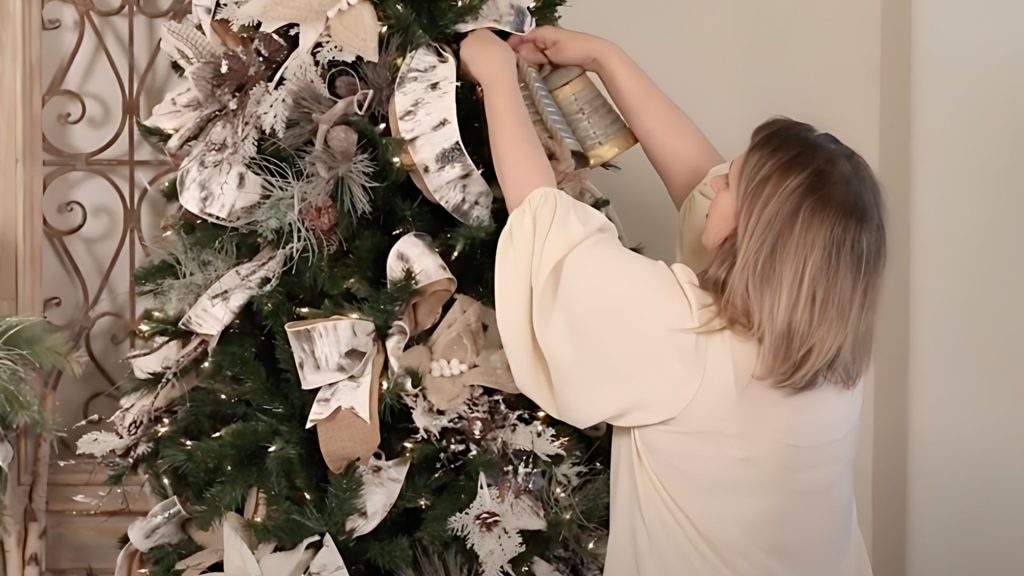
Time to add the ornaments! This is where your tree really starts to shine.
Begin with Larger Ornaments and Place Them Deeper into the Tree
- Start with your biggest ornaments.
- Put these closer to the trunk to fill in the gaps.
- Use different shapes and finishes – mix matte, shiny, and textured ones.
- Spread them out evenly so no area looks too heavy.
- Make sure they’re secure on the branches.
Hang Smaller, More Detailed Ornaments on the Outer Branches
Now, add smaller ornaments to the outer branches. These add detail and show off your tree’s shape.
- Stick to your neutral colors – silver, gold, and white work great.
- Mix it up with glass baubles, little figurines, and other small decorations.
- Hang them at different heights to make it interesting.
Tip: Balance the Placement to Avoid Clustering Similar Ornaments
Keep an eye on how you’re spreading out your ornaments. Don’t put too many similar ones close together. Step back often to check how it looks. If you need to, use hooks of different lengths to adjust where ornaments hang.
Step 7: Finishing Touches
We’re almost done! Let’s add those final details to make your tree perfect.
Fill Any Remaining Gaps with Smaller Decorations
Look for any empty spots and fill them with small decorations. Use tiny ornaments, pinecones, or mini figurines. Make sure they match your theme and colors. Don’t go overboard – you want it to look full, not crowded.
Add a Few More Ribbon Bows or Tails to Cover Green Spaces
Use any leftover ribbon to make small bows or tails. Put these where you can still see too much green. Make sure they match the other ribbons on your tree. If you’re using wired ribbon, shape it nicely.
Tip: Step Back and Adjust Any Decorations as Needed
Take one last look at your tree from a distance. Check if everything looks balanced. Make any final adjustments to ornaments, ribbons, or florals.
Make sure everything is secure. Look at your tree from different angles to ensure it looks good.
And there you have it! Your neutral Christmas tree should now look amazing. Enjoy your beautifully decorated tree!
For a more detailed tutorial, check out the video below:
Wrapping It Up
Decorating a neutral Christmas tree might seem tricky initially, but you’ve created something special with these steps. Remember, the key is in the details – choosing the right color scheme to add those final touches.
Your tree now tells a story of elegance and warmth, all while staying true to a neutral palette.
As you step back and admire your work, take a moment to appreciate how each element comes together to create a cohesive, beautiful whole.
Whether you’re hosting guests or enjoying a quiet evening at home, your neutral Christmas tree will be a stunning centerpiece for your holiday celebrations.
So, what’s next? Grab a cup of hot cocoa, turn on some festive music, and bask in the glow of your perfectly decorated tree!