


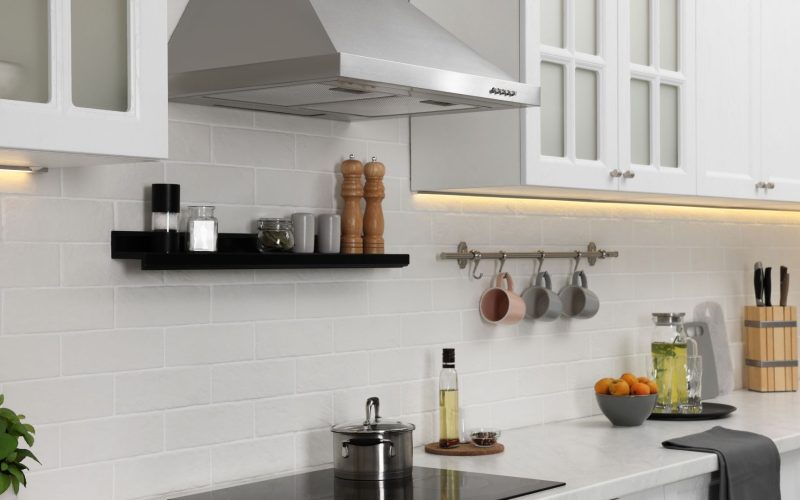
If you want to upgrade your kitchen with a custom range hood but are unsure where to start, you’re in the right place.
Building your range hood might seem daunting, but with clear steps and some guidance, you can create a beautiful DIY range hood that will transform your kitchen.
This guide will walk you through the entire process in this article, from planning the size and shape to the final painting and installation.
Get ready to impress your friends and family with your DIY skills!
Types of Range Hoods
There are several range hoods, each with unique features and applications.
- Wall-Mounted Range Hoods: These are the most common, installed directly on the wall above your cooktop.
- Under-Cabinet Range Hoods: Designed to fit under upper kitchen cabinets, blending seamlessly into the kitchen design.
- Island Range Hoods: Ideal for kitchens with a freestanding island or peninsula.
- Ducted: Vents air outside your home
- Ductless (Recirculating): Filters and recirculates air back into the kitchen.
Choosing the Right Range Hood
There are several important factors to consider when selecting a range hood.
- Size: The hood should be at least as wide as your cooktop.
- Style: Match the hood with your kitchen’s aesthetic.
- Functionality: Ensure the hood has enough CFM (cubic feet per minute) to remove smoke and odors effectively.
- Range Hood Insert: Choose an appropriately sized and suitable insert for optimal performance.
Tools and Materials Needed for Building a Range Hood
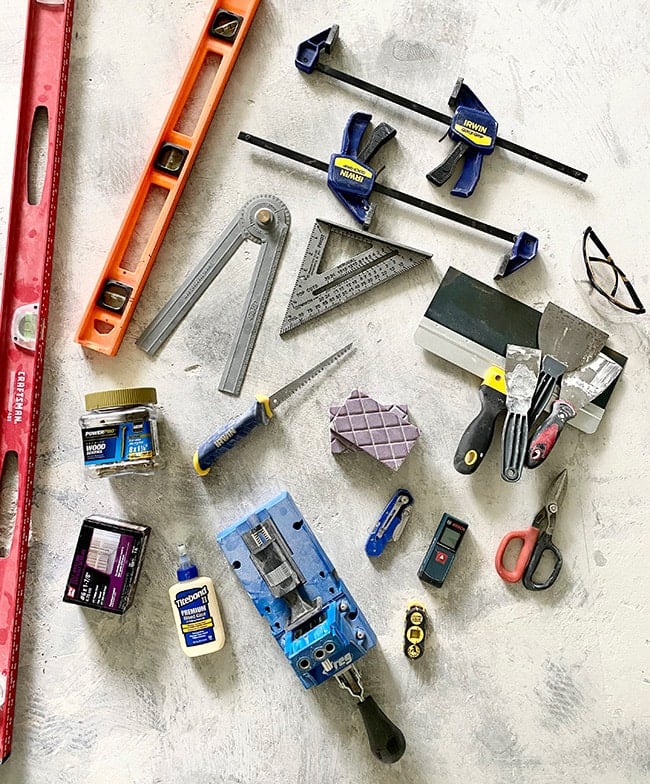
You’ll need access to various tools and materials to build your custom range hood. Here’s a list to help you get started:
Tools
- Miter saw or chop saw
- Circular saw or table saw
- Drill
- Kreg jig
- Jigsaw or Dremel multi-max
- Electric sander
- Heavy-duty staple gun
- Level
- Stud finder
- Angle finder
- T-square (optional, but helpful)
- Clamps
- Utility knife
- Tin snips
- Taping knives
- Drywall saw
- Sanding sponges
Materials
- Range hood insert (size and model will vary based on your cooktop)
- 2×4 boards for framing (approximately six 8-foot boards)
- 1×4 boards for additional framing (around eight 8-foot boards)
- 4×8-foot sheet of 1/2-inch plywood (for the arch)
- 1x4x8-foot MDF (about five boards)
- 1/2-inch 4×8-foot drywall (three sheets)
- Vinyl corner bead (3/8-inch bullnose for rounded edges)
- Power Pro construction screws (2-inch, 2.5-inch, and 3-inch)
- Drywall screws
- Wood glue
- Corner bead adhesive
- Joint compound
- Drywall tape
Safety Precautions While Building
Safety is crucial when building a DIY range hood. Prioritizing safety ensures a smooth and successful DIY project.
- Follow Instructions: Always adhere to the manufacturer’s guidelines for tools and materials.
- Wear Protective Gear: Use safety glasses, gloves, and a dust mask.
- Maintain a Clean Work Area: Keep your workspace tidy to avoid accidents.
- Check Tools: Ensure all power tools are in good working condition and your work surface is stable and level.
- Learn Proper Techniques: Familiarize yourself with safety guidelines and techniques for each project step.
Step 1: Determine the Range Hood Size, Spacing, and Shape
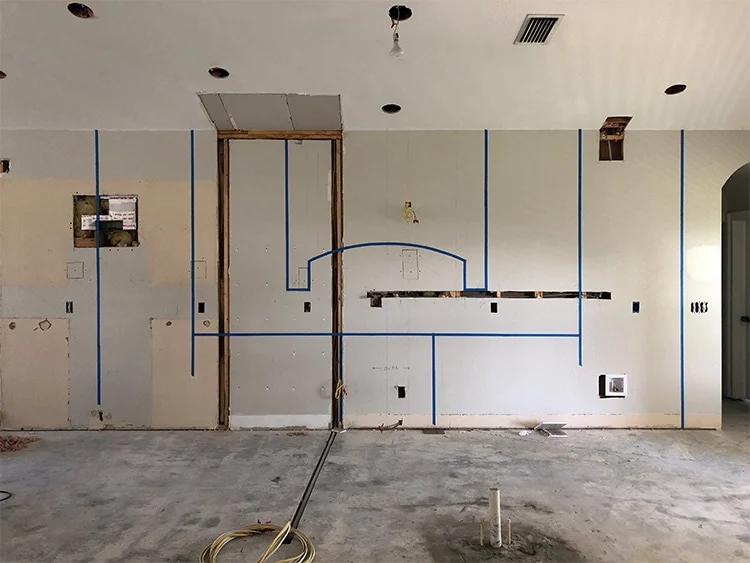
- The first step in building your DIY range hood is carefully measuring and planning the size, spacing, and overall shape.
- Start by using painter’s tape to outline the area where the range hood will be placed. This will help you visualize the scale and layout of your kitchen space.
- Example: Let’s go for an oversized range hood measuring 75 inches wide, 65 inches high, and 22 inches deep.
- The key is to choose a size that complements your cooktop and kitchen design. Remember, the range hood should be at least as wide as your cooking surface.
- Also, please pay close attention to the placement, ensuring it will be centered and balanced in the space.
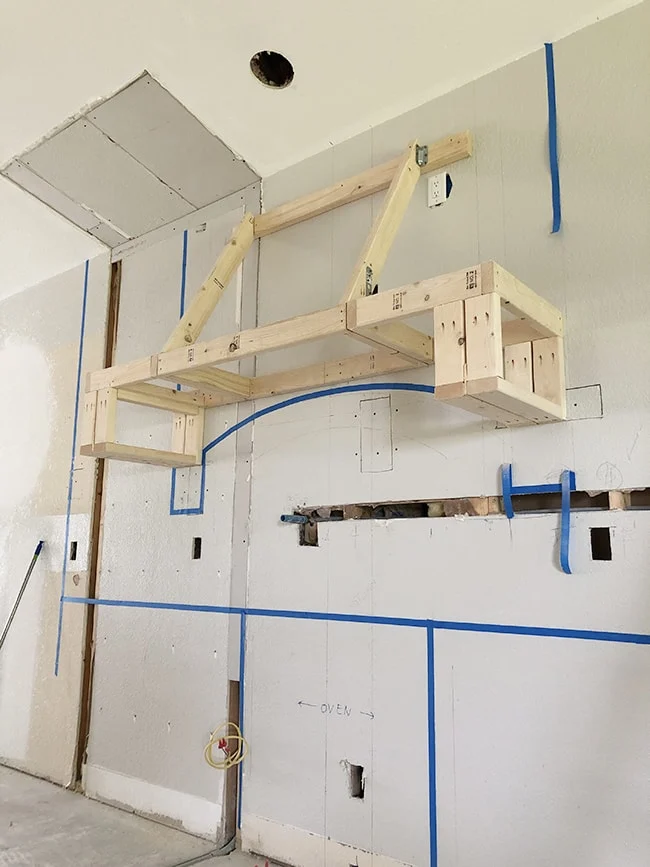
Step 2: Build the Support Frame
- Once the size and shape have been determined, it’s time to construct the support frame for the range hood insert.
- A frame slightly larger than the range hood insert will be created to allow room for the mounting brackets.
- After measuring and marking the desired placement, secure the frame to the wall, ensuring it is level.
- To provide additional support, add bracing that spanned multiple wall studs.
- Double-check the level and make necessary adjustments before moving on to the next step.
Step 3: Building the Bottom of the Frame
- Now that the main support frame is in place, it’s time to start building out the bottom portion of the range hood. Begin by constructing a simple rectangle on one side and attaching it to the insert frame.
- Add two smaller rectangles underneath to form the initial sides of the hood.
- When framing the bottom section, it’s essential to consider the placement of the drywall.
- You want to ensure solid attachment points for the drywall corners, as this will prevent any shifting or movement in the future. You can accomplish this by ripping down 2×4 boards and attaching them to create complete corners.
- Repeat this process on the other side to complete the main lower section of the range hood frame.
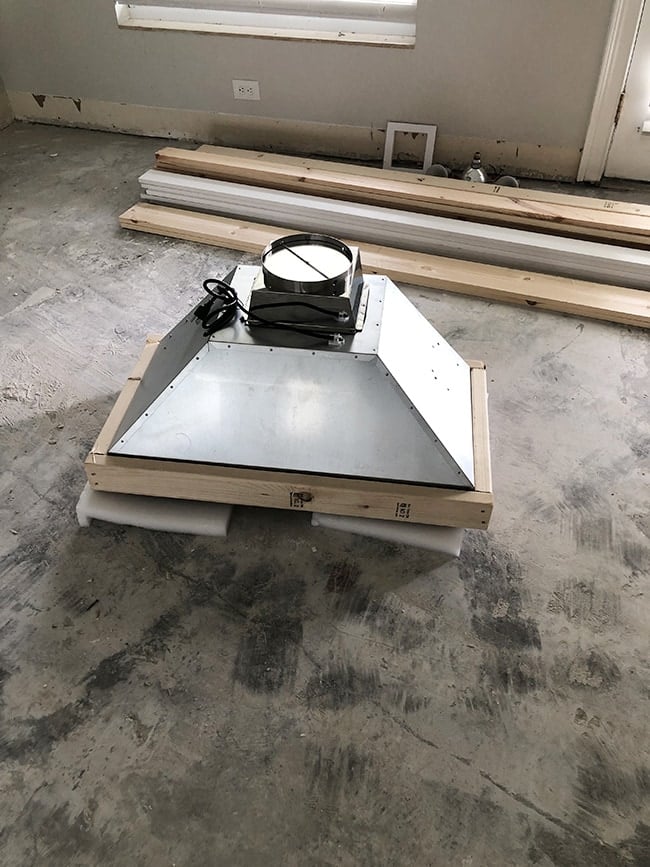
Step 4: Install Hood Insert
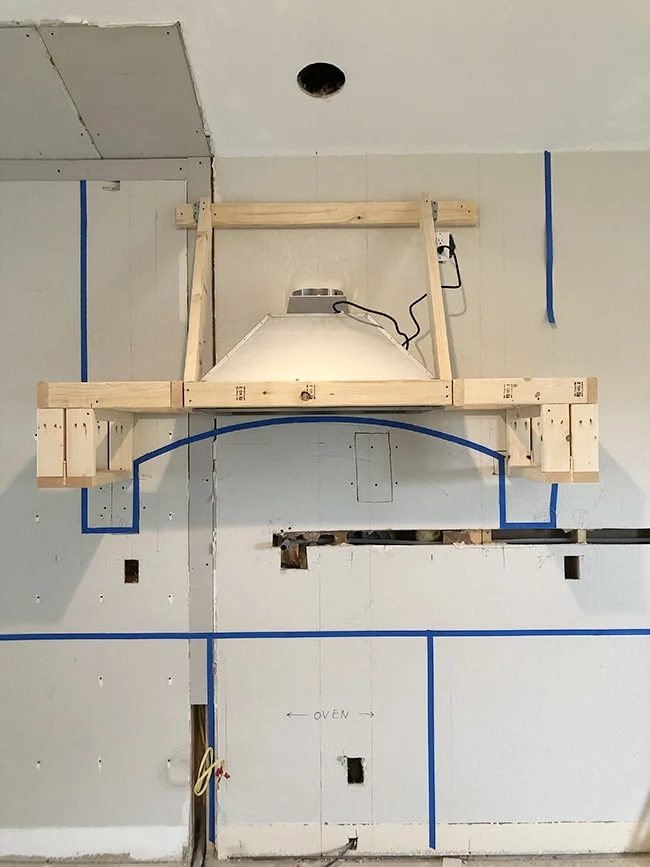
- With the frame in place, it’s time to install the range hood insert.
- This is a two-person job, as the insert needs to be held securely while the mounting brackets are attached to the frame.
- Before installing the insert, have an electrician wire an outlet above the hood.
- Once the electrical work is done, carefully lift the insert into place and secure it to the frame using the provided L-brackets.
- Then, plug in the unit and test it to double-check that everything is level and functioning properly.
Step 5: Frame the Hood
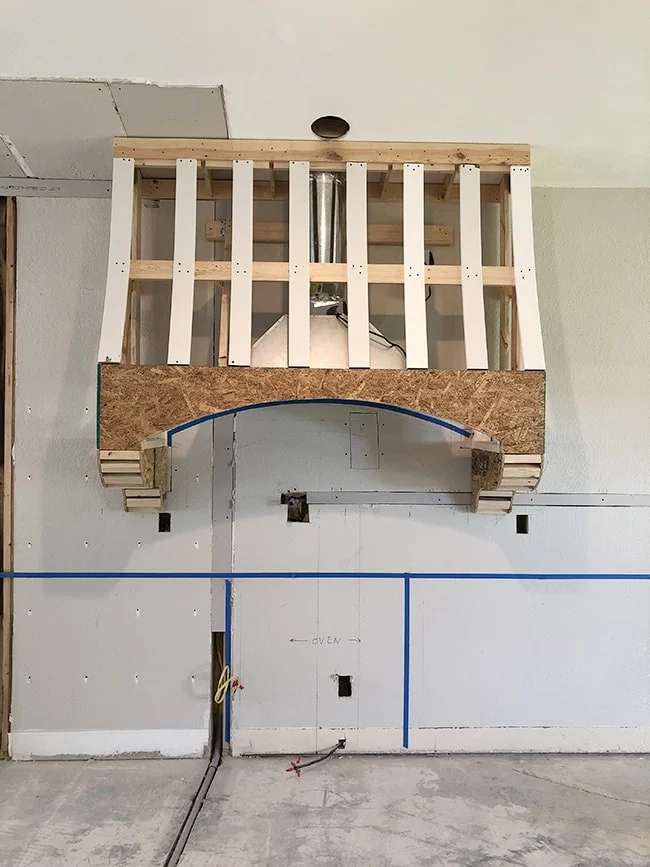
- The final step in the framing process is building out the range hood’s top section.
- Construct a rectangular frame to accommodate the ductwork and provide the desired shape and profile.
- Considering the placement of the duct opening, you can create the top frame using a combination of 2x4s and 1x4s.
- Incorporate an arched plywood piece within the top frame to add character and dimension to the range hood.
- This curved element was achieved using the string and pencil trick to draw the arch and then carefully cutting it out with a jigsaw.
- To complete the framing, add the decorative corbels, which are built using a similar sandwich technique with plywood and wood spacers.
- The combination of the arch and corbels creates a stunning, custom-built appearance.
Step 6: Drywall

- With the framing complete, it’s time to tackle the drywall installation.
- Cut the drywall pieces to size, using a utility knife to score and snap the drywall along the measured lines.
- The curved sections, especially on the corbels, are the most challenging part of the drywall installation.
- Scoring and wetting the back of the drywall will help it bend more easily without cracking.
Step 7: Adding Corner Bead, Mudding, and Sanding
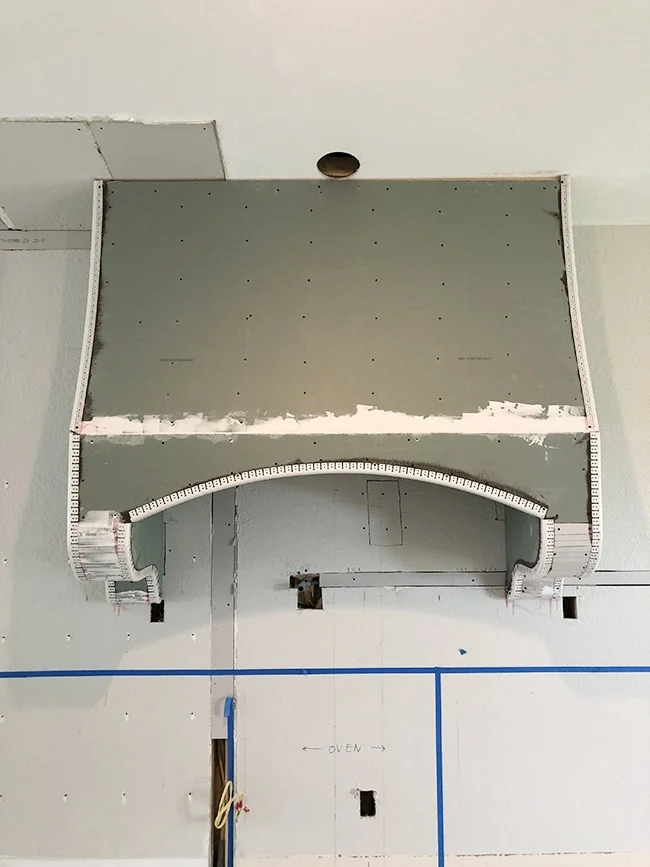
- With the drywall in place, the next step was to apply the corner bead and start the mudding process.
- Use a 3/8-inch bullnose corner bead to create the rounded edges, giving the range hood a professional look.
- Apply multiple layers of joint compound, or “mud,” to smooth out the seams and create a seamless surface.
- After each layer is dried, sand the area down, gradually working towards a flawless finish.
Step 8: Priming and Painting
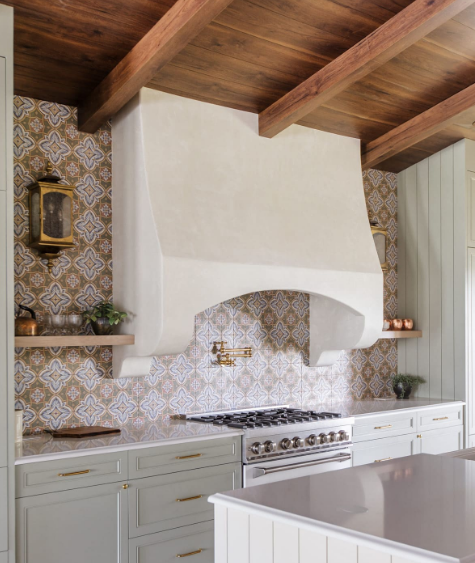
- The final step in the DIY range hood journey is the priming and painting.
- Apply a high-quality primer to the entire surface, ensuring the drywall and joint compound are properly sealed and prepared for the topcoat.
- You can choose a versatile white color for the paint that complements the overall aesthetic of our kitchen.
- When painting, take your time and apply multiple thin, even coats to achieve full coverage and a professional-looking result.
- With the painting complete, your DIY range hood is now ready to be installed and become the stunning focal point of your kitchen!
- It’s crucial to take the time to properly fill in any gaps or imperfections and sand everything down until it’s perfectly smooth.
Conclusion
There, you have everything you need to know to build your custom DIY range hood!
By following the steps outlined in this guide, you can transform your kitchen with a stunning, one-of-a-kind feature that will impress you.
Remember, the key is to take your time, pay attention to the details, and don’t be afraid to get a little creative.
Whether you opt for a simple, streamlined design or a more ornate, decorative range hood, the finished product will reflect your style.
So, what are you waiting for? Gather your tools, dive into the project, and get ready to enjoy your brand-new, custom range hood.