Have you ever looked at your door and thought it needed a little upgrade? Sometimes, small changes can make a big difference in your home. Changing the door handle is one simple way to give your home a fresh look.
Whether replacing an old one or just wanting to add a touch of style, learning how to change a gold door handle is easier than you think. In this post, we’ll guide you through the steps to help you update your door with a new and stylish handle, even if you’ve never done it before.
So, let’s get in!
Tools and Materials You Will Need
Before you start, it’s important to have everything you need. Here’s a simple list of the tools and materials you should gather:
- Screwdriver – usually a Phillips or flat-head, depending on your current screws
- Allen wrench – this is often needed for the screws inside the handle
- Measuring tape – to ensure everything is aligned
- The new gold door handle – including all its parts like screws, latch, and handle plates
- A clean cloth – for cleaning the area after installation
Having these tools ready will make the process smoother. Now, let’s move on to the
Steps on How to Change a Gold Door Handle
Here’s how you can change a gold door handle:
Step 1: Removing the Old Door Handle
The first thing you need to do is remove the old door handle. Don’t worry, it’s not difficult.
Unscrew the Existing Handle:
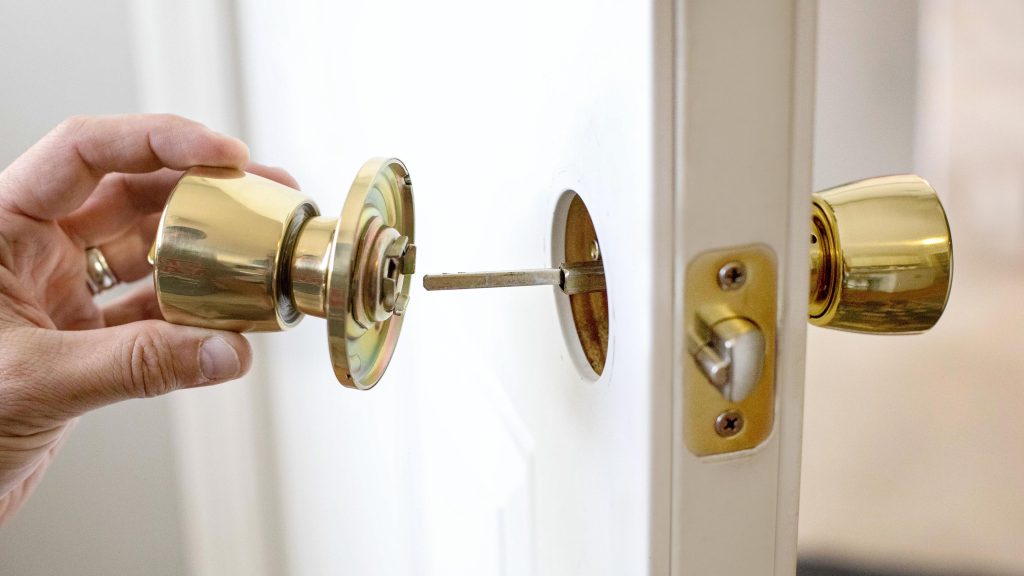
Start by finding the screws that hold the old handle in place. These are usually on the inside part of the door handle. Use your screwdriver to remove these screws. Keep the screws in a safe place in case you need them later.
Remove the Handle Plates
After you’ve taken out the screws, gently pull the door handle away from the door. You’ll notice two plates on either side of the door. These plates cover the hole where the handle sits. Carefully pry these off using your screwdriver. Be gentle to avoid damaging the door.
Extract the Latch Mechanism
The latch is the part inside the door that catches when you turn the handle. To remove it, simply pull it out from the edge of the door. Sometimes, you might need to unscrew it first if it’s secured with screws.
Now that you’ve removed the old handle, you’re halfway through the DIY door handle replacement process!
Step 2: Installing the New Gold Door Handle
With the old handle out of the way, it’s time to install the new door handle. Follow these steps carefully.
Align the New Latch Mechanism
Take the new latch and insert it into the hole at the edge of the door. Make sure the latch is facing the right way. The curved side should be towards the direction where the door closes. Use your screwdriver to secure it with screws if needed.
Attach the Handle Plates
Next, take the new handle plates and place them over the holes on both sides of the door. The plates should fit snugly. If your new handle comes with screws, use them to secure the plates to the door.
Install the New Handle
Now, take the new gold door handle and insert it through the holes in the plates. Make sure both sides of the handle are aligned with each other. Once they’re in place, use the provided screws to fasten them tightly.
If your handle has a lock, make sure it’s working before you finish tightening everything.
Tighten All Screws
Go back and check all the screws, including the ones on the handle and the plates. Make sure everything is secure and tight. This will ensure that your handle doesn’t wobble or come loose over time.
So, you’ve now successfully learned how to change a gold door handle and completed the gold door handle upgrade. But before you’re done, there are a couple more things to check.
Step 3: Testing the New Handle
Testing your new door handle is an important step. Here’s how to do it:
Check for Proper Alignment
Try turning the handle to see if it moves smoothly. The latch should retract easily when you turn the handle and spring back when you release it. If the handle feels stiff or doesn’t move correctly, you may need to loosen the screws slightly and adjust the alignment.
Test the Locking Mechanism
If your new gold door handle has a lock, test it to ensure it works. Turn the key or press the lock button to see if the door locks and unlocks properly. If the lock doesn’t work, double-check that all the parts are installed correctly.
Step 4: Final Touches
With the new handle installed and working, it’s time to finish up with some final touches.
Clean the Area
Take your clean cloth and wipe down the new handle and surrounding area. This will remove any fingerprints, dust, or debris left from the installation. A clean handle will shine brightly and enhance the look of your door.
Decorative Additions
If you want to go a step further, consider adding some decorative elements to complement your gold door handle upgrade. For example, you could install a matching gold door knocker or update the door’s paint color to make the gold stand out even more.
Conclusion
Updating a door handle is a simple yet effective way to refresh your home’s appearance. By following the steps in this guide, you’ve learned how to change a gold door handle without any hassle. Whether you’re looking to enhance the style or replace a worn-out handle, this DIY project is both easy and satisfying.
With just a few tools and some straightforward instructions, you’ve completed a gold door handle upgrade that brings both beauty and practicality to your space. Enjoy the transformation and take pride in your door’s new, polished look!
Remember, small changes like these can have a big impact, and with a little bit of effort, you can achieve great results.