Step-by-Step Guide To Building Your DIY Fireplace

Step-by-Step Guide To Building Your DIY Fireplace

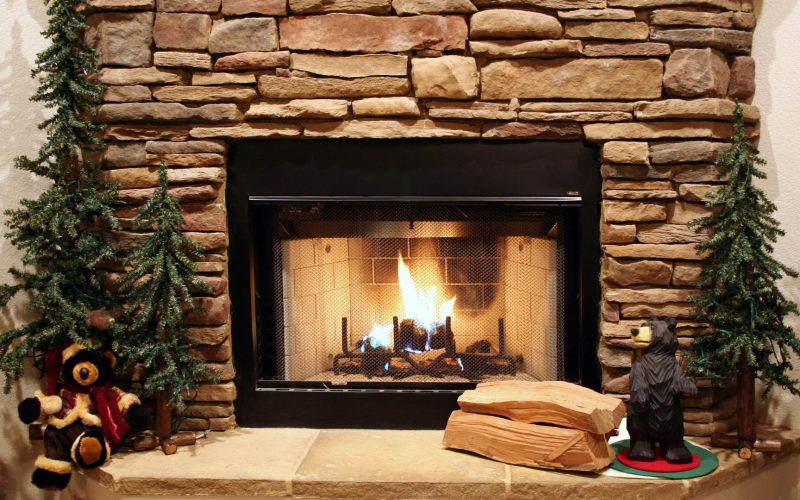
Many homeowners dream of a cozy fireplace but worry about the cost and complexity of installing one.

Building your DIY fireplace can seem like a big task, especially if you’re unfamiliar with construction work.

This guide will show you how to build your DIY fireplace, saving you money and giving you a sense of accomplishment.

You’ll learn the basics of DIY fireplace construction, from choosing materials to finishing touches.

In this article, you’ll find a list of tools and materials you’ll need, clear instructions for each step of the building process, safety tips to remember, advice on getting necessary permits, and ideas for personalizing your fireplace.

By the end, you’ll have the knowledge to create a warm, inviting focal point in your home.

Steps to Make Your DIY Fireplace

Building your fireplace can be a fun and rewarding project.

This guide will walk you through the process, from planning to finishing touches.

Follow these steps to create a cozy focal point for your home.

Step 1: Planning and Preparation

Planning and Preparation

Planning and getting ready are key to building your fireplace.

This step involves picking the right type, finding the best spot, staying safe, and gathering your needs.

1. Picking Your Fireplace Type

Think about different fireplaces: electric, gas, or wood-burning.

Each has its good and bad points.

Electric ones are easy to install but might not feel as real.

Gas fireplaces give steady heat but need a gas line.

Wood-burning ones feel traditional but need more upkeep.

Consider your home’s layout, how much it will cost, and what you like best.

2. Finding the Right Spot

Put your fireplace where it looks good and works well.

It should fit nicely with your room’s style and be a main feature.

Ensure it’s in a spot that heats well and doesn’t get in the way of walking or furniture.

Check if the floor can hold its weight and if there’s good airflow for a gas fireplace.

3. Staying Safe and Getting Permits

Follow all safety rules to avoid fires. Keep the fireplace away from things that can burn easily.

Find out what permits you need and get them.

You might need inspections to make sure everything follows local rules.

Talking to an expert, especially for gas or electric work, is a good idea to ensure everything is safe and legal.

4. Tools and Materials

For the building, you’ll need

  1. 2x4s and 2x3s for the frame,
  2. MDF boards are used for the outside, and drywall and concrete boards are used for finishing.
  3. Pick an electric or gas insert based on what you decided earlier.
  4. Get nails, screws, and glue to hold things together.
  5. For the final look, prepare paint, stain, or veneer.
  6. Ensure you have tools like saws, drills, a nail gun, and a level.

With good planning, you’ll be ready to start building your fireplace safely and effectively.

Step 2: Building the Frame

Building the Frame

A strong frame is key for your fireplace.

You’ll need 2×4 and 2×3 lumber, a saw, drill, screws, level, and measuring tape.

Start by measuring your fireplace insert.

1. Measuring and Cutting Lumber

Mark and cut the lumber to fit these sizes. Be exact to make sure the insert fits well.

Make a rectangle on the floor with 2x4s to build the base, matching the insert’s size. Screw the corners together.

Next, add upright 2x4s at each corner.

Use a level to ensure they’re straight up and down. To make them sturdy, connect these with horizontal 2x4s.

Put extra horizontal pieces where the insert will go.

2. Assembling the Frame

  1. Move the frame to where you want the fireplace.
  2. Find the wall studs and mark them.
  3. Screw the frame to these studs.
  4. Check that it’s level and fix it if it’s not.
  5. Add more support with cross-pieces.
  6. Put 2x4s across the frame every so often.
  7. For the insert, add 2×3 supports inside the frame.
  8. Make sure these are level and lined up right.
  9. Check everything again.
  10. Make sure all measurements are right and the frame is strong.
  11. See if the insert fits well.
  12. Fix anything that’s not quite right before you move on.

Stay safe: wear goggles and gloves when cutting and building.

Work in a bright, clear area.

Use clamps to hold the wood in place while you screw it together.

Remember, a well-built frame keeps your fireplace stable and safe.

Take your time to get it right for the best results.

Step 3: Installing the Fireplace Insert

Installing the Fireplace Insert

Installing your fireplace insert is a key step. It’s important to do this right for safety and good use. Let’s look at how to put in both electric and gas inserts.

1. For Electric Inserts

  • Check what the maker says you need.
  • Make sure you have a special 120V outlet nearby that’s grounded.

2. For Gas Inserts

  • Look at what the unit needs, especially for airflow and gas hookups.
  • Check that you have the right connections and space around it.

3. When You Put the Insert In

  • For electric ones, measure to make sure it fits well.
  • Please put it in the middle and make it level.
  • Use brackets if the maker says to.
  • For gas ones, be careful to keep them away from things that can burn.
  • Make sure it’s level and lines up with the air pipes.
  • Use the right screws to keep it in place.

4. For Hooking Things Up

  • You plug it in with electric inserts.
  • Keep the wires tidy and safe, and test them to ensure they work.
  • For gas inserts, get a pro to connect the gas. They’ll make sure it’s safe and follows the rules. If it needs power too, plug it in and secure any extra wires.

For gas fireplaces, airflow is really important:

  • Put in the air pipes like the maker says.
  • Make sure the pipes are on tight and sealed well.
  • Check that the smoke can get out okay.
  • Look for any blocks or leaks in the pipes.
  • Do a final check to ensure everything is safe and follows the rules.

Getting your insert right keeps you safe and makes your fireplace work well.

Follow these steps, and get help when needed to have a great fireplace that makes your home cozy.

Step 4: Adding the Surround and Mantel

Adding the Surround and Mantel

First, let’s attach the boards to the frame.

Measure your frame and cut drywall or concrete boards to fit.

Use screws or nails to secure these boards firmly.

Make sure they’re level.

Then, use joint compound to smooth where the boards meet and sand any rough spots for a nice finish.

1. Installing the Mantel

Now, for the mantel. You have a few choices:

Wood gives a classic, cozy look.

You could use oak, pine, or old wood for a rustic feel.

Stone looks fancy and strong.

Marble, granite, or limestone are good options. The metal feels modern.

Try stainless steel or wrought iron for a sleek look.

To put up the mantel:

  1. Measure how high and wide it should be.
  2. Use a level to make sure it’s straight.
  3. Put metal brackets on the frame to hold the mantel.
  4. Use strong screws for this.
  5. Place the mantel on these brackets and screw or bolt it in place.
  6. Check that it’s sturdy.

If you want a hearth, think about how it will look:

Use materials that go well with your room, like stone, tile, or brick.

Pick colors and textures that make your fireplace look good.

2. Safety Considerations

For safety:

  1. Use materials that won’t burn easily.
  2. Make the hearth stand at least 16 inches in front and 8 inches on each side of the fireplace opening.
  3. This keeps sparks away from the floor.
  4. Choose a surface that isn’t slippery to avoid falls.
  5. Check everything is secure and level.
  6. Paint, stain, or seal the materials to protect them and make them look nice.

Ensure all safety measures, like good airflow and fire-safe materials, are in place.

This step makes your fireplace look great and keeps it safe.

Take your time to get it right, and you’ll have a beautiful, safe fireplace to enjoy.

Step 5: Finishing Touches

Finishing Touches

Now it’s time to make your fireplace look great.

Let’s go through the final steps:

1. Finishing the Surface

  • Pick a paint, stain, or veneer that fits your room’s style.
  • Clean the surface well and sand any rough spots.
  • If needed, use a primer before painting.
  • Apply thin, even layers. Let each one dry before adding the next.

2. Adding Trim and Moldings

  • Choose trim that looks good with your fireplace and room.
  • Measure carefully before cutting.
  • Use a saw to cut the trim at the right angles.
  • Attach the trim with nails or glue. Make sure it’s straight and level.
  • Fill any small gaps or nail holes and sand them smooth.

3. Using Tiles or Brick Veneer

  • Pick tiles or bricks that match your style.
  • Put adhesive on the surface.
  • Start at the bottom and work up. Keep each row level.
  • Use spacers to keep gaps even.
  • Once set, add grout between tiles or bricks.
  • Seal the surface to protect it.

4. Final Checks

  • Look closely for any missed spots or problems.
  • Make sure everything is stable and lined up right.
  • Touch up paint or stain if needed.
  • Fill any last gaps.
  • Clean everything to remove dust.

Let everything dry completely.

Then, step back and look at your work.

Your fireplace should now look great and fit in well with your room.

Step 6: Maintenance and Safety Tips

Maintenance and Safety Tips

Keeping your fireplace safe and in good shape is important.

It makes your fireplace last longer, keeps you safe, and helps it work better.

Electric

  • Clean it and the area around it often.
  • Remove dust from air holes and inside parts.
  • Check the cord and plug for damage.

Gas

  • Clean the glass, fake logs, and inside.
  • Look for gas leaks and blocked burners.
  • Make sure the small flame that stays on is working right.

Wood-burning

  • Clean out ashes after each use.
  • Clean the chimney to stop dangerous buildup.
  • Check that the smoke flap and chimney work well.

Tips and Tricks for Your DIY Fireplace Project

Building your fireplace can be a fun and rewarding experience. Here are some helpful tips and tricks to make your project smoother:

  • Plan thoroughly: Take time to sketch out your design and make detailed measurements. This will help you avoid costly mistakes later.
  • Choose materials wisely: Pick materials that match your home’s style and skill level. Prefabricated panels can be easier for beginners to work with than brick or stone.
  • Invest in quality tools: Good tools make the job easier and safer. Consider renting or borrowing specialized tools if you don’t want to buy them.
  • Work with a buddy: Having extra hands can be incredibly helpful, especially when lifting heavy materials or holding things in place.
  • Take your time with framing: A solid frame is crucial. Double-check all measurements and use a level frequently to ensure everything is straight.
  • Create a mock-up: Before finalizing your design, create a cardboard mock-up to visualize how the fireplace will look in your space.
  • Consider hidden storage: Consider incorporating hidden storage spaces into your design for firewood or tools.
  • Focus on ventilation: Proper ventilation is key for safety and efficiency. Research the best ventilation options for your chosen fireplace type.
  • Don’t rush the finishing touches: The final details can make a big difference. Take your time with painting, tiling, or adding decorative elements.
  • Document your process: Take photos and notes as you go. This can be helpful if you need to make repairs or changes later.
  • Be flexible: Sometimes things don’t go exactly as planned. Be ready to adapt your design if needed.
  • Learn from others: Look at online tutorials, join DIY forums, or talk to experienced DIYers for advice and inspiration.
  • Prioritize safety: Always wear protective gear and follow safety guidelines, especially when working with power tools or installing gas lines.

Remember, building a fireplace is a big project. It’s okay to take breaks and tackle it in stages. The key is to enjoy the process and take pride in creating something unique for your home.

Conclusion

Building your fireplace is a rewarding project that adds warmth and charm to your home.

We’ve covered the key steps: planning and preparation, building the frame, installing the insert, adding the surround and mantel, applying finishing touches, and maintaining your fireplace safely.

Remember, each step is important for creating a safe and beautiful fireplace.

Take your time, follow the instructions carefully, and don’t hesitate to ask for help when needed.

Safety should always be your top priority, especially when dealing with gas lines or electrical components.

You can create a stunning focal point in your home with patience and attention to detail.

Enjoy the building process, and soon, you’ll be cozying up to your very own fireplace, knowing you built it yourself.

Stay safe, have fun, and happy building!

Total
0
Shares
Leave a Reply

Your email address will not be published. Required fields are marked *

Prev
8 Essential Tips for a Stress-Free Move to Boston

8 Essential Tips for a Stress-Free Move to Boston

No matter what purpose you’re moving to Boston for, whether for getting a

Next
10 Easy Steps to Make Stunning Mercury Ornaments
Easy Steps to Make Stunning Mercury Ornaments

10 Easy Steps to Make Stunning Mercury Ornaments

Creating beautiful decorations for your home can be both exciting and daunting

You May Also Like