


Are you ready to give your little one a big kid bed? A DIY toddler floor bed might be just what you need! As a parent, I know how exciting and scary this transition can be.
That’s why I’m here to walk you through creating a safe, cozy sleep space for your growing child. This project is perfect for those who want a custom bed without breaking the bank.
In this guide, I’ll show you how to build a twin-size floor bed using basic materials like 2x4s and wood dowels.
Don’t worry if you’re new to DIY – I’ll break it down into simple steps anyone can follow. By the end, you’ll have a sturdy, adorable bed that your toddler will love.
Ready to get started? Let’s dive in and create a special place for your little one to dream!
Before We Begin
- This bed is designed for a standard twin mattress (38″ x 75″).
- The bed opening is 39″ x 76″ to allow for bedding.
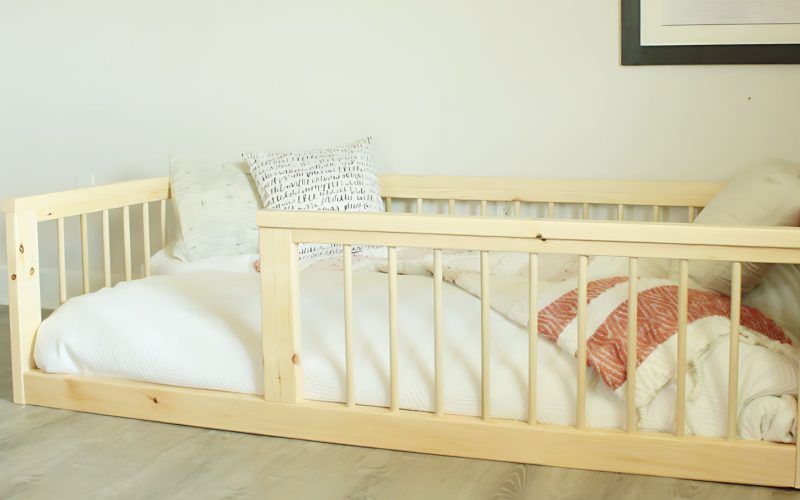
- Final dimensions: 21 ½” tall, 44″ wide, and 81″ long.
- Remember, you can adjust rail spacing to fit your child’s needs.
What You’ll Need: Materials
- (4) 2x4x8 boards
- (3) 2x2x8 boards
- (3) 2x3x8 boards
- (14) ¾” diameter x 48″ long dowel rods
- 2 ½” pocket hole screws
- 2 ½” wood screws
- Two ⅞” timber screws (optional)
- Wood glue
- Sandpaper
Tools
- Miter saw
- Drill/driver
- Pocket hole jig
- ¾” Forstner bit
- Kreg Multi-Mark (helpful, but not required)
- Various clamps (helpful but not required)
- Rubber mallet (helpful, but not required)
Steps to Follow in The Process
Building a DIY toddler floor bed involves seven key steps, from assembling the side rails to adding the finishing touches.
We’ll guide you through creating the bed frame, attaching the panels, and ensuring your little one has a safe, sturdy structure.
Each step is broken down into manageable tasks, making this project accessible even for DIY beginners.
Step 1: Assemble the Side Rails
Let’s start by creating the side rails. Cut two 35″ pieces each from 2×2 and 2×4 boards for the top and bottom of each side.
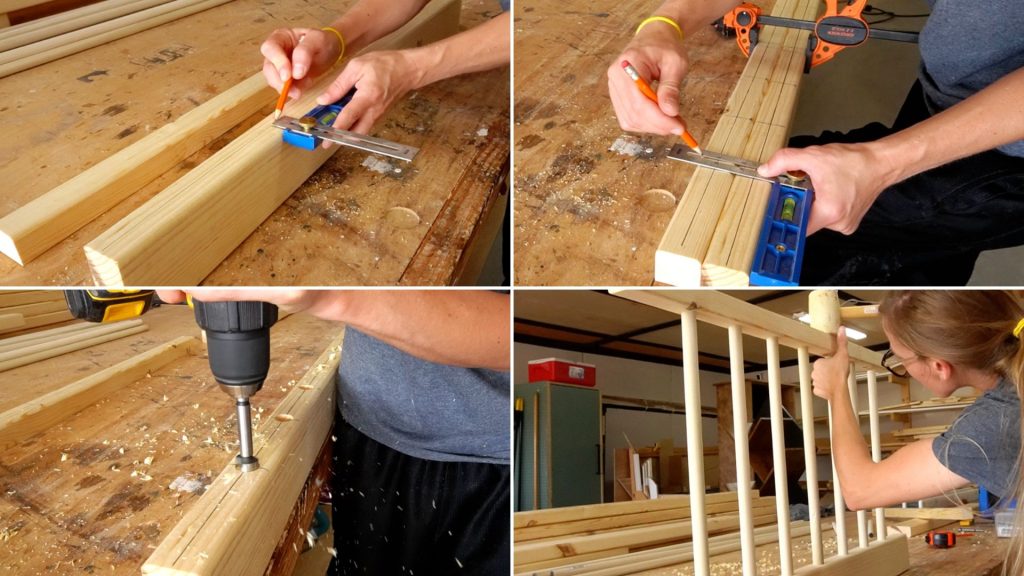
Mark the center of these pieces and then make marks every four ¼” along their length for the dowel holes. Drill ¾” diameter holes at these marks.
Add pocket holes to the ends of these pieces for later use. Now, cut your dowels to about 16″ long. It’s time to bring it all together!
Apply wood glue to the holes and insert the dowels, connecting the top and bottom pieces. This part can be tricky, so take your time.
A rubber mallet can help tap the dowels into place. Once you’ve assembled one side rail, repeat the process to create a second identical panel.
These will form the sides of your toddler floor bed.
Step 2: Add Corner Posts
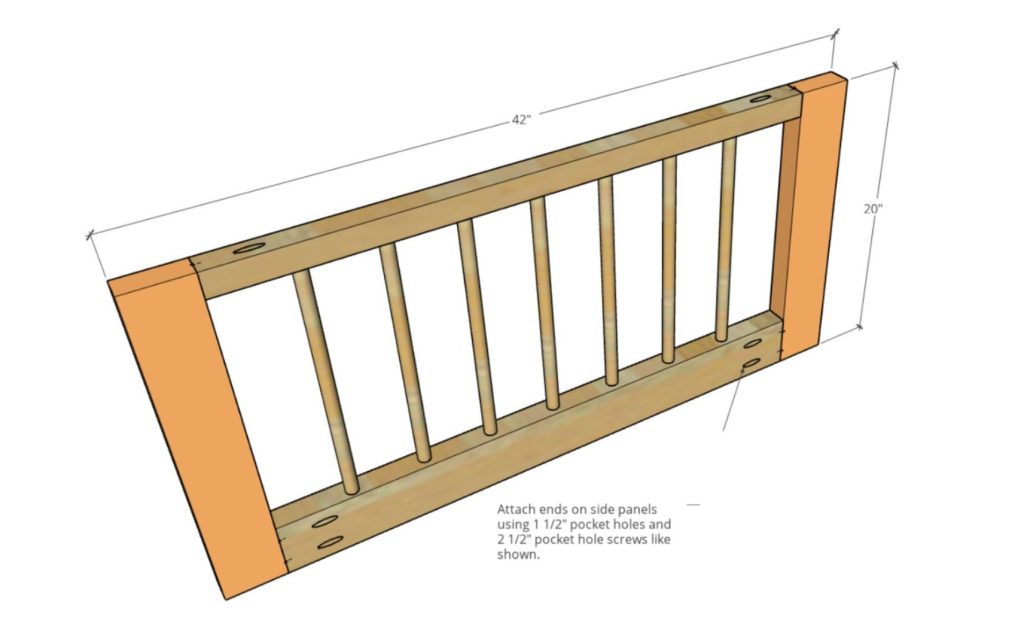
With your side panels ready, it’s time to add some height. Measure the overall height of your side panels – it should be around 20″, but don’t worry if it’s slightly different.
Cut four pieces of 2×4 to this length – these will be your corner posts.
Attaching these posts is straightforward: use your pocket hole jig to drill holes in the ends of your side panels, then use 2 ½” pocket hole screws to secure the posts.
As you attach each post, make sure everything is square and tight. These corner posts add stability to your bed, giving it a more finished look.
Once you’ve attached all four posts (two for each side panel), give everything quick sand to smooth any rough edges. Your bed is starting to take shape now!
Step 3: Create the Back Panel
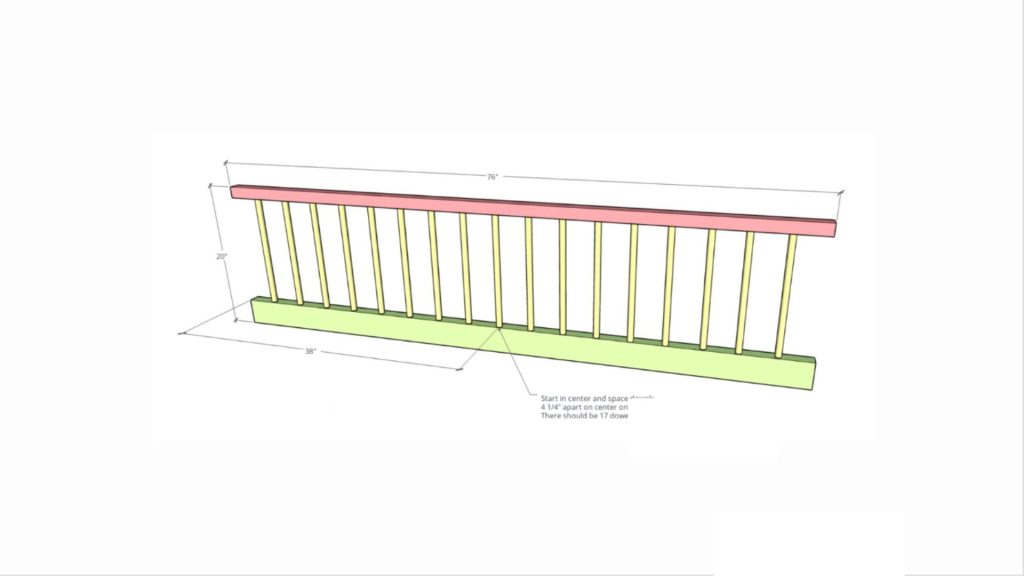
The back panel is similar to the sides, just longer. Start by cutting a 2×2 and a 2×4 to 76″ long.
Find the center point (38″ from each end) and mark your dowel locations every four ¼” just like you did for the sides. Drill out those ¾” diameter holes in both pieces.
Now, cut your dowels to length and get ready for assembly.
Apply wood glue to the holes and insert the dowels, connecting the top and bottom pieces. This panel won’t need pocket holes, so set it aside to dry once you’ve got all the dowels in place.
The back panel will stabilize your bed and prevent your little one from scooting back against the wall. Take a moment to admire your handiwork—you’re halfway there!
Step 4: Join the Back and Sides

Now it’s time to bring your bed frame together. Take your completed back panel and position it between the two side panels.
To attach them securely, you’ll use timber screws or wood screws. If you’re using timber screws, they’ll add both strength and a decorative touch.
Place two screws at the bottom and one at the top for each side. Remember to predrill your holes to prevent the wood from splitting.
If you prefer, you could use regular 2 ½” or 3″ wood screws instead. Alternatively, you could use pocket holes and pocket hole screws for a hidden fastener look.
Whichever method you choose, make sure the connections are tight and secure.
This step is crucial for the stability of your bed, so take your time to ensure everything is properly aligned and firmly attached.
Step 5: Build the Front Panel
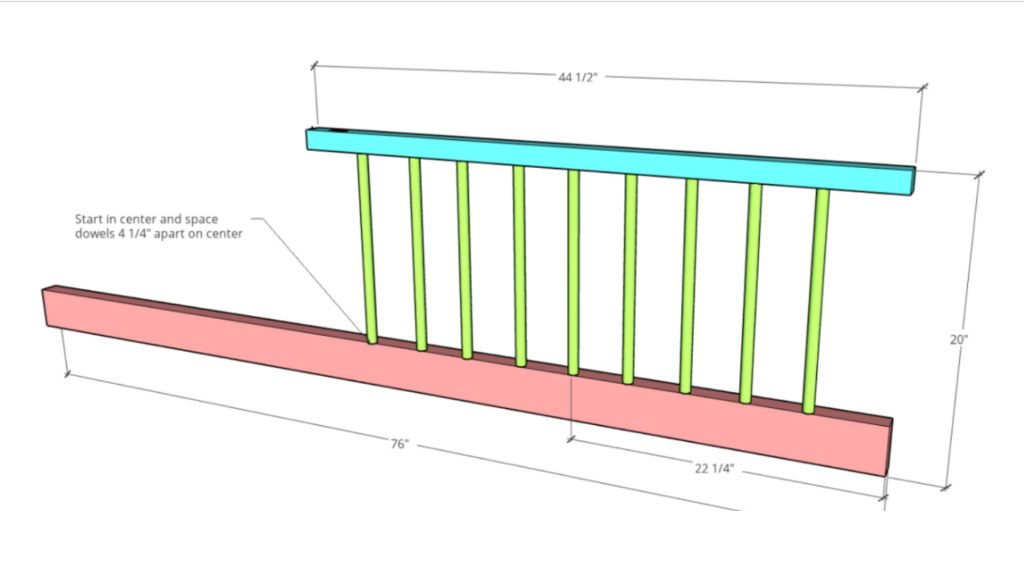
The front panel is slightly different from the back. Start by cutting a 2×4 to 76″ long and a 2×2 to 44 ½” long. Since these pieces aren’t the same length, you must adjust your marking process.
Find the center of the shorter 2×2 piece (22 ¼” from each end) and mark your dowel locations as before.
Then, line up the right ends of both pieces and transfer these marks to the 2×4. Drill your holes and glue in the dowels as you did for the other panels.
Next, cut a 16 ½” long piece of 2×4 to add to the end of the dowel rails. Drill pocket holes in the bottom end of this piece and attach it to the end of your front panel using pocket hole screws.
This completes your front panel, allowing easy access to the bed.
Step 6: Attach the Front Panel
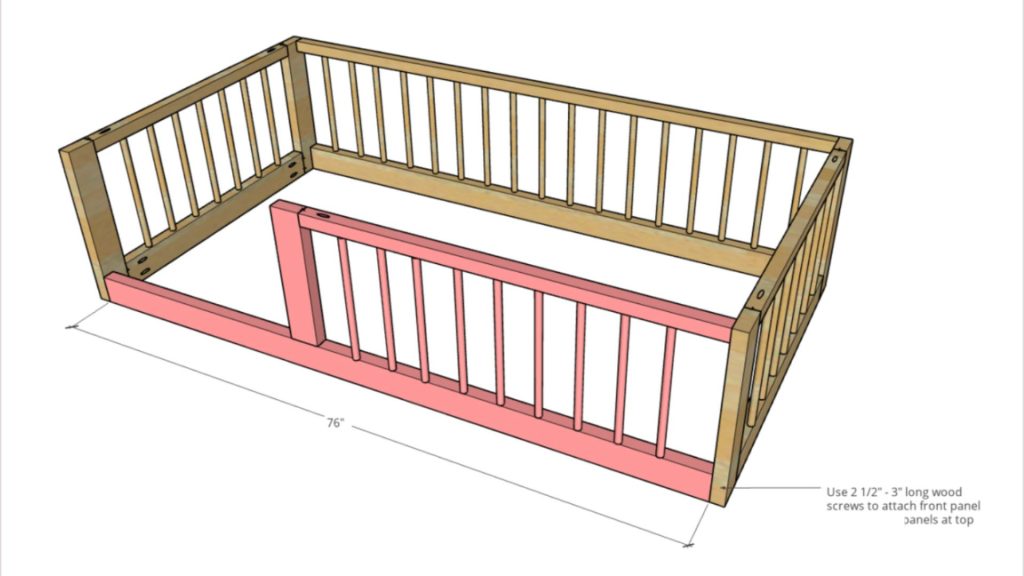
With your front panel complete, it’s time to attach it to the rest of the bed frame. Position the front panel between the two side panels, ensuring everything is square and level.
Just as you did when attaching the back panel, use timber screws or wood screws to secure the front panel in place.
Add two screws at the bottom and one at the top on each side for a sturdy connection. If you’re using timber screws, remember to predrill your holes.
This step finishes the main structure of your toddler floor bed. Take a moment to check all your connections and ensure everything is tight and secure.
Your little one’s safety is paramount, so don’t hesitate to add extra screws if you feel it’s necessary.
Step 7: Add the Top Rails
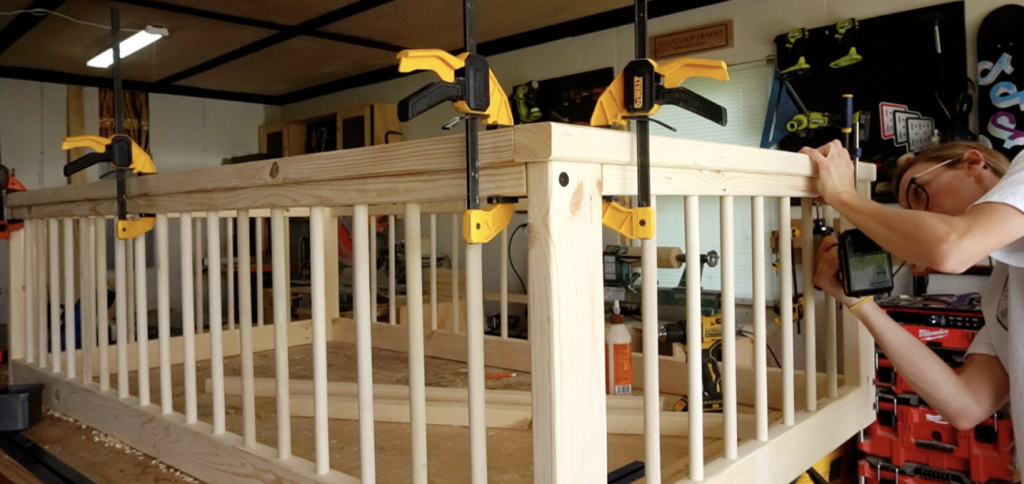
The final touch is adding the top rails, which will give your bed a polished look and cover any exposed pocket holes.
Cut 2×3 boards (or 2″ wide strips from 2x4s if you prefer) to fit around the top of the bed frame.
Start at the back, keeping the inside edges flush with the bed frame so any overhang falls on the outside.
Attach this piece using wood glue and 2 ½” wood screws from the bottom side. Then, add the left side, front, and finally, the right side in the same manner.
Once all the top rails are in place, sand any sharp edges to make the bed child-friendly.
Finally, apply a clear coat like Polycrylic or finish as desired, sanding between coats for a smooth finish.
Final Thoughts
Well, there you have it – your DIY toddler floor bed! I hope this guide has made the building process clear and fun.
Remember, this bed is more than just a place to sleep. It’s a milestone in your child’s growth and a testament to your DIY skills.
As your little one snuggles into their new bed, you’ll be proud to know you made it with your hands.
This project saves money and allows you to customize the bed to fit your child’s room perfectly.
Don’t hesitate to ask for help if you run into any snags.
And hey, why not share your finished product? I’d love to see how your DIY toddler floor bed turned out! Sweet dreams to your little one, and happy building to you!